1. Kernel seeds are not bootable, "out of the box". They have to be configured by yourself in order to do anything. You have to add your list of hardware devices to the seed and compile it. To get the information, execute the following commands: lspci -n, and cat /proc/cpuinfo. Keep that information handy. You'll be using it soon.
2. A properly configured seed is only the beginning. There are numerous programs that require other settings to be turned on. For instance, iptables requires that most of the settings under Networking options --> Network packet filtering framework have to be turned on or made into modules before it can function. Clearly, setting up iptables is beyond the scope of just getting the machine up and running. In some cases, such as with my laptop, I haven't added anything beyond the basics. In others, I've had to do some retuning after things get running the right way.
Working with kernel seeds is like working with any other kernel with one exception: with kernel seeds, you are provided a stable base upon which you build a functional computer. There is no guesswork as far as the basics are concerned. Kernel seeds are my sane make defconfig for the real world.
In order to use the seeds, the first step is to install the kernel source you desire. For the Gentoo Linux user, you have numerous choices. You can install many different kernels versions directly from portage. You can get source directly from kernel.org. You can make up custom source with patches.
Since the best way to learn is by example, let's take a look at one. This information is from my system, Core-too; an amd64 system running on a Core2 Duo 2.33GHz chip. I will be configuring a 2.6.31 vanilla kernel.
core-too ~ # lspci -n
00:00.0 0600: 8086:2770 (rev 02)
00:01.0 0604: 8086:2771 (rev 02)
00:1c.0 0604: 8086:27d0 (rev 01)
00:1d.0 0c03: 8086:27c8 (rev 01)
00:1d.1 0c03: 8086:27c9 (rev 01)
00:1d.2 0c03: 8086:27ca (rev 01)
00:1d.3 0c03: 8086:27cb (rev 01)
00:1d.7 0c03: 8086:27cc (rev 01)
00:1e.0 0604: 8086:244e (rev e1)
00:1f.0 0601: 8086:27b8 (rev 01)
00:1f.1 0101: 8086:27df (rev 01)
00:1f.2 0101: 8086:27c0 (rev 01)
00:1f.3 0c05: 8086:27da (rev 01)
01:00.0 0200: 1106:3043 (rev 06)
01:01.0 0401: 1412:1712 (rev 02)
03:00.0 0300: 10de:01d3 (rev a1)
core-too ~ #
core-too ~ # cat /proc/cpuinfo
processor	 : 0
vendor_id	 : GenuineIntel
cpu family	 : 6
model		 : 15
model name	 : Intel(R) Core(TM)2 Duo CPU     E6550  @ 2.33GHz
stepping	 : 10
cpu MHz	 : 2331.000
cache size	 : 4096 KB
physical id	 : 0
siblings	 : 2
core id	 : 0
cpu cores	 : 2
apicid		 : 0
initial apicid	 : 0
fpu		 : yes
fpu_exception	 : yes
cpuid level	 : 10
wp		 : yes
flags		 : fpu vme de pse tsc msr pae mce cx8 apic sep mtrr pge
mca cmov pat pse36 clflush dts acpi mmx fxsr sse sse2 ss ht tm pbe
syscall nx lm constant_tsc arch_perfmon pebs bts rep_good pni dtes64
monitor ds_cpl vmx smx est tm2 ssse3 cx16 xtpr pdcm lahf_lm tpr_shadow
vnmi flexpriority
bogomips	 : 5053.84
clflush size	 : 64
cache_alignment : 64
address sizes	 : 36 bits physical, 48 bits virtual
power management:

processor	 : 1
vendor_id	 : GenuineIntel
cpu family	 : 6
model		 : 15
model name	 : Intel(R) Core(TM)2 Duo CPU     E6550  @ 2.33GHz
stepping	 : 10
cpu MHz	 : 2331.000
cache size	 : 4096 KB
physical id	 : 0
siblings	 : 2
core id	 : 1
cpu cores	 : 2
apicid		 : 1
initial apicid	 : 1
fpu		 : yes
fpu_exception	 : yes
cpuid level	 : 10
wp		 : yes
flags		 : fpu vme de pse tsc msr pae mce cx8 apic sep mtrr pge
mca cmov pat pse36 clflush dts acpi mmx fxsr sse sse2 ss ht tm pbe
syscall nx lm constant_tsc arch_perfmon pebs bts rep_good pni dtes64
monitor ds_cpl vmx smx est tm2 ssse3 cx16 xtpr pdcm lahf_lm tpr_shadow
vnmi flexpriority
bogomips	 : 5053.97
clflush size	 : 64
cache_alignment : 64
address sizes	 : 36 bits physical, 48 bits virtual
power management:
core-too ~ #
core-too ~ # cat /etc/fstab
none		/proc		proc		defaults	0 0
none		/dev/shm	tmpfs		defaults	0 0
/dev/sdb1	/		reiserfs	defaults	1 1
/dev/sdb2	none		swap		swap		0 0
/dev/sda1	/mnt/WinXP	ntfs-3g		defaults	1 0
core-too ~ #
1) Take the results of lspci -n and paste them at the following site: http://kmuto.jp/debian/hcl/. With my example, the page would look like this:
Pressing the "Check" button produces this result:
Now that you have all the needed information to configure your kernel, it's time to get to it.
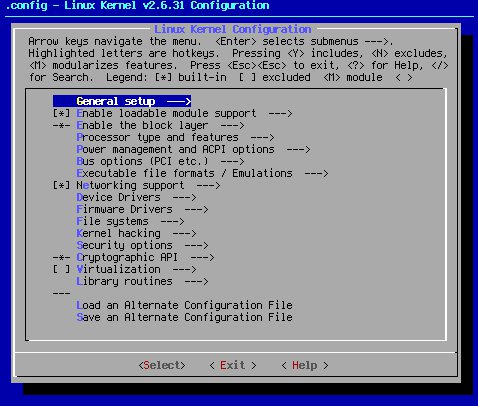
There are numerous configuration scripts built into the kernel. While I personally use make xconfig, it has become clear to me that is not the best option for an initial Gentoo setup. Because the basic Gentoo system is CLI (Command Line Interface) only, make menuconfig makes a lot more sense to use. The following screen shots, while modified slightly for artistic reasons, are more likely what you, the user, is going to see. If you don't see all of what is on the images presented, that's okay. As long as you can use the arrow keys to successfully navigate make menuconfig, and get to the places shown in the images, you are doing fine.
2) cd /usr/src/linux-2.6.31
3) make menuconfig. You will be greeted by the following screen:
The above panel shows the many configurable areas of the kernel. Most of the areas shown need not be bothered with by the normal kernel user. Because most of the important areas of the kernel have been pre-configured for your convenience, you really need only concern yourself with the areas of the kernel that configure it specifically for your hardware.
Note: With make menuconfig, the asterisk (*) means "yes", and the (m) means "module". The (-*-) means that some or all items under a certain area are selected, either by default, or because another part of the configuration file of the kernel has selected them. The (---) is either a separator, or an area where (-*-) is possible, but none of the options have been selected or turned on by other areas of the configuration file.
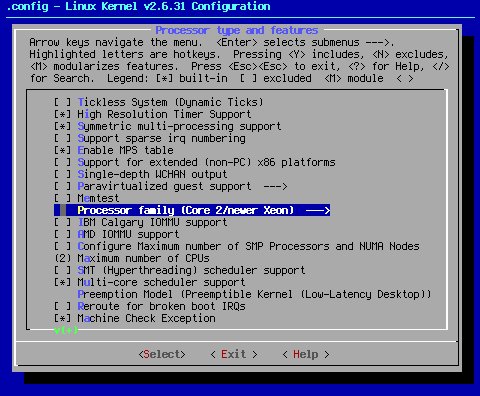
The first stop is Processor type and features. Since cat /proc/cpuinfo told me I have an Intel Core2 Duo processor, I need to make sure the kernel is informed. To get to that area with make menuconfig, press the down arrow three times, and then hit the <enter> key.
Notes:
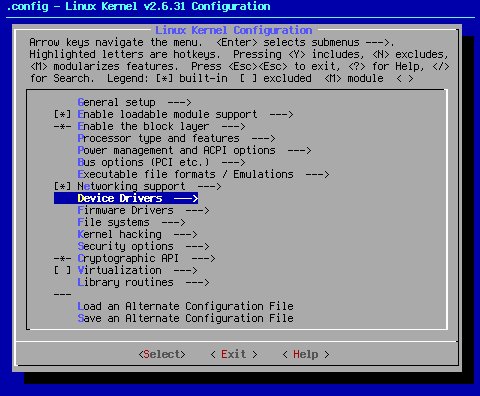
Once you have configured your CPU, you can move on to configure other areas. To get back to the main screen, hit the right arrow key once to move to <Exit>, then hit the <enter> key.
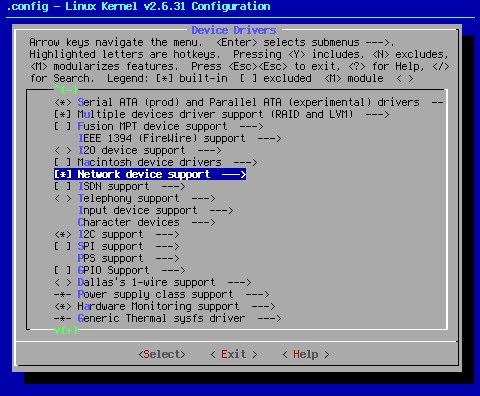
Next, you will need to move to Device Drivers, where most of the action is going to occur.
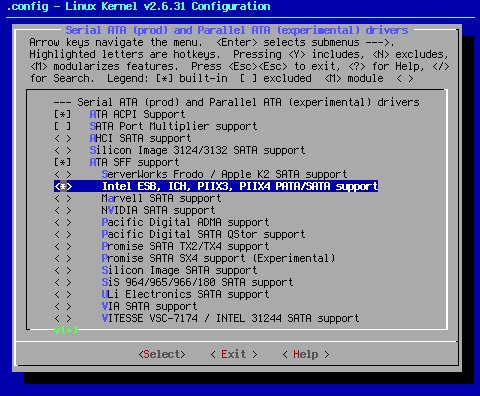
The first device actually setup is the hard drive controller. I use the Serial ATA (prod) and Parallel ATA (experimental) drivers (ATA) drivers, hereafter called libata drivers. With Gentoo, use of these drivers is now standard practice as the latest ~arch versions of udev only support /dev/sd(x) nomenclature.
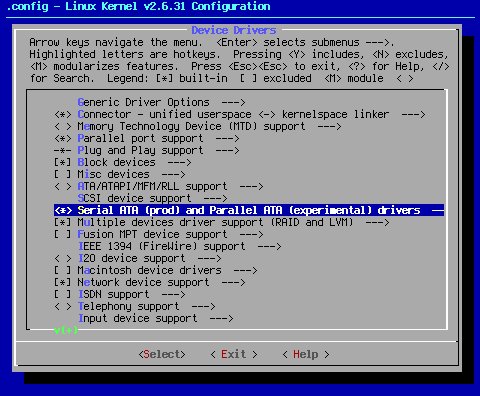
Notes:
Moving down, we come to the next hardware device that must be configured for your system: The network interface driver.
Since I'm using a Via Rhine 10/100 knock-off, I'd want to go to the Ethernet (10 or 100Mbit) (NET_ETHERNET) section, and select VIA Rhine support (VIA_RHINE), as in the panel below.
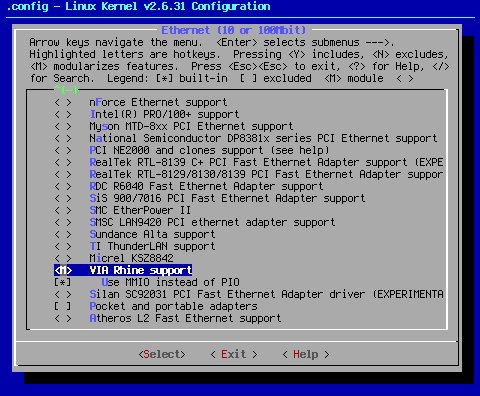
Note: it is good practice to set up your network devices as modules, as in the example above. This is especially true for wireless. Most wireless drivers simply will not function when compiled into the kernel. They must be set as modules.
The next thing that needs to be set is the random number generator. That shows up under Character devices.
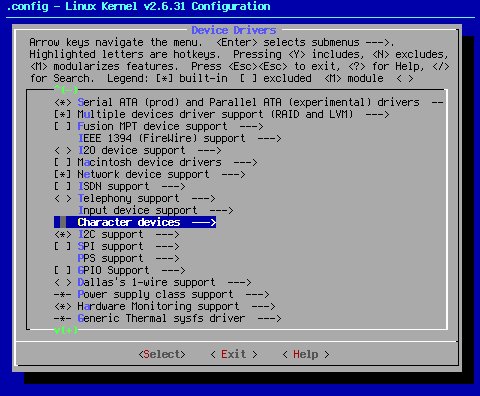
As always, it is best to pick only the driver needed by your system. Turning on other drivers can cause issues, so pick only the one that applies, as below.
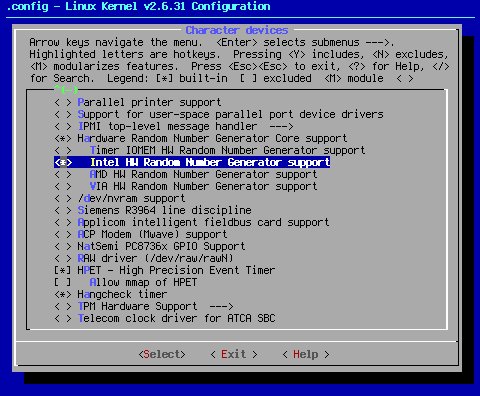
Note: This particular setting seems to not care whether it is turned on or set as a module. For that reason, I turn it on to keep the number of modules to a minimum. You can set it as either, depending on your preferences, and the requirements of the packages on your system that use this setting.
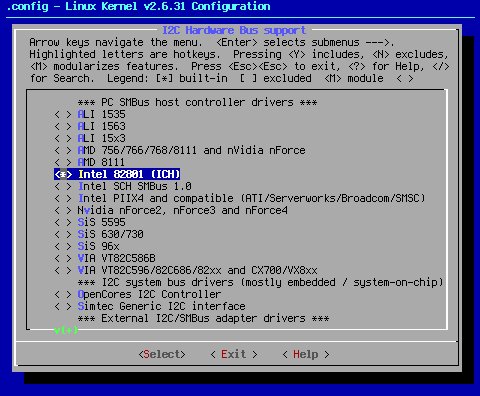
Next, move down to I2C Hardware Bus support.
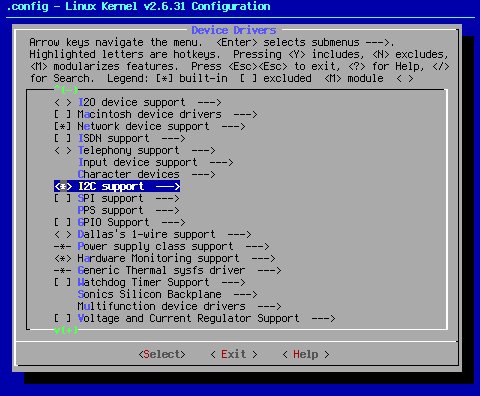
Once again, it's best to only set the required driver, as seen below.
Next, move down to Hardware Monitoring support and turn on the Intel Core (2) Duo/Solo temperature sensor (SENSORS_CORETEMP) module, since the machine has a Core2 chip.
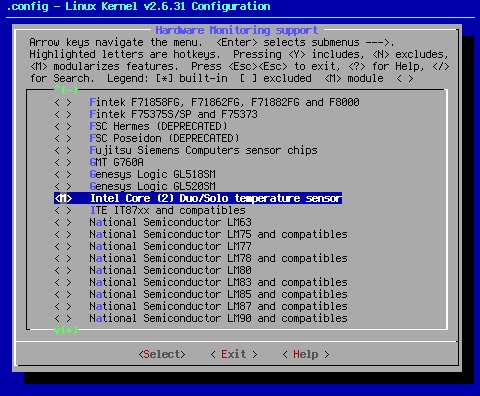
Through the use of lm_sensors, I also know that this machine also uses a Winbond W83627EHF chip. That would be added thusly:
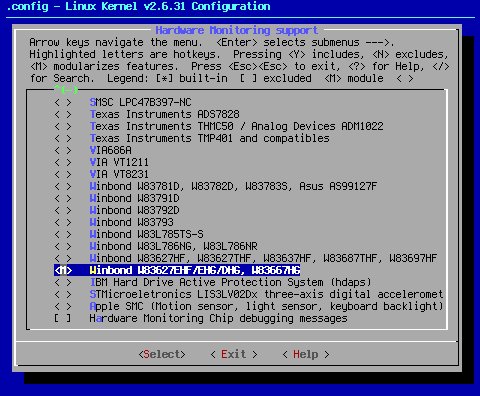
Note: These drivers should definitely be set as modules since lm_sensors prefers to call them to start as to have them come up by themselves at boot time.
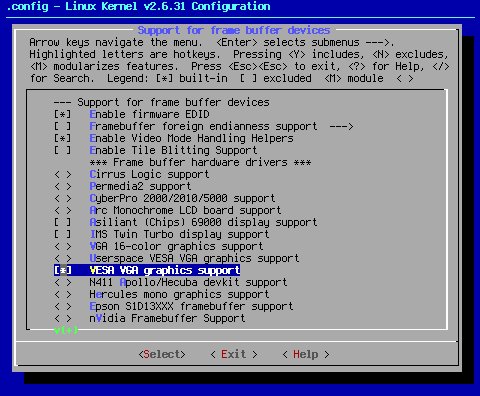
Next, move down to Graphics support. If you are running an nVidia card, you don't need to do anything here, except to make sure that the VESA framebuffer is turned on. This is a default situation, and will look like the panel below:<Exit>
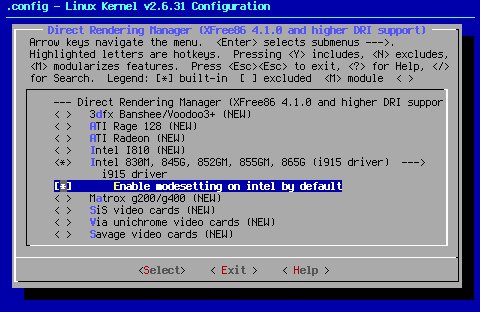
If you are running with an Intel GPU, you really want to make the following changes:
Under /dev/agpart (AGP Support), turn on Intel 440LX/BX/GX, I8xx and E7x05 chipset support (AGP_INTEL). Don't set as module. Under Direct Rendering Manager (XFree86 4.1.0 and higher DRI support) (DRM), check the following:
![]() IMPORTANT INFORMATION CHANGE:
IMPORTANT INFORMATION CHANGE:
Note that KMS for Intel GPU's was stabilized with kernel version 2.6.35, and is the recommended option for any and all Intel i810 or greater GPU's. You read correctly. (Enable modesetting on intel by default) (KMS) is now the Pappy recommended and supported way to go.
The next major device on the list would be the soundcard. I use a very simple setup with my sound card as it doesn't support MIDI. Therefore, I don't need to set it up to use a synth of any kind. See below.
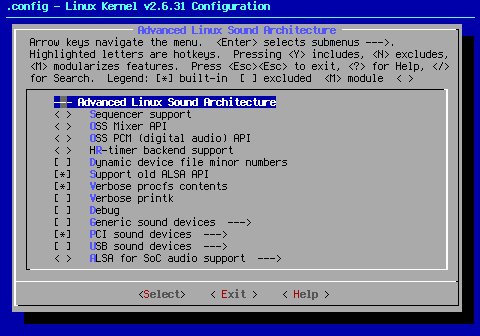
Most users will want to add a bit more at this stage. Since most modern sound chips also have MIDI functions, it's better for most users to configure ALSA more like what you see in the panel below.
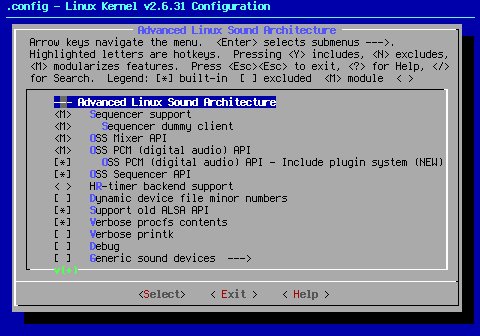
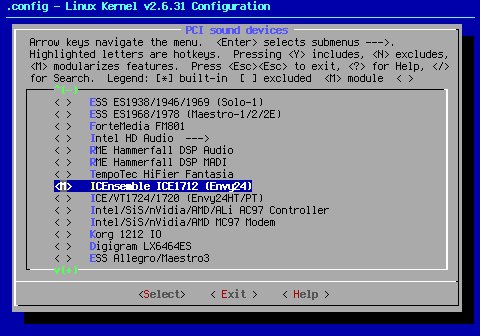
When setting up the actual sound card driver under PCI sound devices (SND_PCI), configure it as a module, like the example below. This is how Gentoo does it.
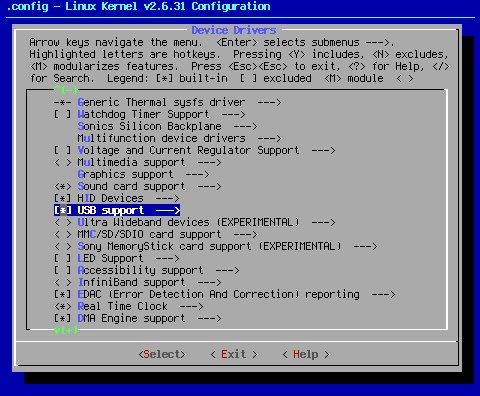
The last hardware device that needs to be worried about with this system is USB support. Since this machine uses an Intel motherboard, the USB hardware defaults of UHCI and EHCI are all that's needed.
Now that you've set the major hardware componants into the kernel, the final setting is the File sytstems settings. If you're using ext2, ext3, or reiserfs, you don't have to set up the file systems in a Seed. All three file systems have been selected by default. If you wish to use any other file system, you have to change that in this portion of the kernel. Also, I recommend turning off unused file system support. Following those rules of thumb, this page will wind up looking like this:
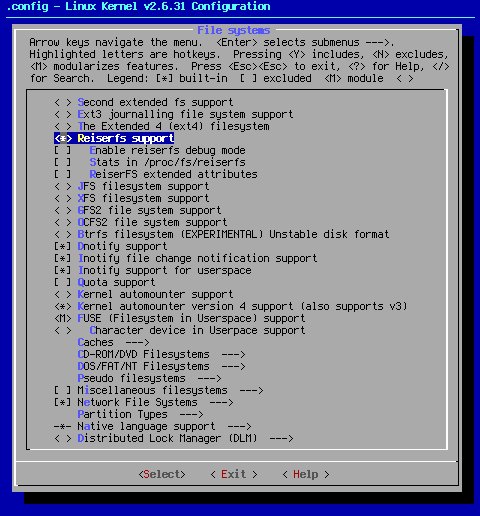
Note: Filesystem in Userspace support (FUSE_FS), if desired, should always be set as module, as shown in the above panel.
4) Take a second look through the make menuconfig screens to make sure there are no mistakes. When satisfied, exit make menuconfig and compile the kernel.
When you're finished, use <Exit> to back out of make menuconfig until you come to the panel below:
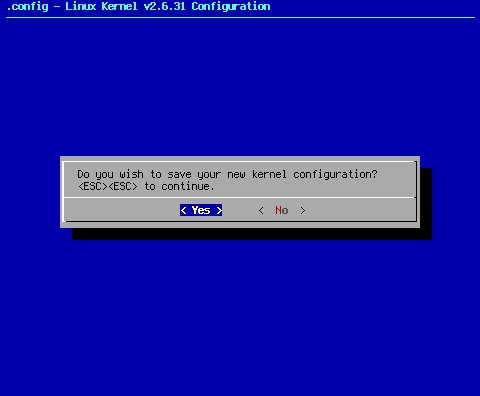
Unless you're in the mood to throw all that work away, and start again from scratch, it really is a good idea to say, "Yes" at this point.
1) make && make modules_install.
2) cp /usr/src/linux-2.6.31/arch/x86/boot/bzImage /boot/vmlinuz-2.6.31.
3) Set up /etc/lilo.conf or /boot/grub.conf to boot the new kernel.
4) If you are using lilo, don't forget to invoke lilo once you have things set up right.
5) Reboot.
6) Check out /var/log/dmesg to make sure your drivers loaded without errors.
For reference, here is the finished kernel .config, sans the Intel video settings.
Cheers!
Pappy